

Preventing Arm Fatigue During Bow Hunts: 7-Step Plan
Preventing arm fatigue during bow hunts starts with shoulder strength, smart form, and the right carry system. Follow this 7-step training plan.

In this article
Table of Contents
- Step 1: Assess Your Fatigue Points Before You Train
- Step 2: Build a Base With Bowhunting Shoulder Exercises
- Step 3: Fix Your Archery Shooting Form to Cut Wasted Energy
- Step 4: Use a Compound Bow Carrying Sling to Save Your Arms on the Hike
- Step 5: Manage Arm Fatigue in the Field
- Step 6: Know the Difference Between Fatigue and Injury
- Step 7: Follow a Progressive Training Timeline
- Conclusion
- Frequently Asked Questions
Last Updated: October 5, 2026
Step 1: Assess Your Fatigue Points Before You Train
Arm fatigue rarely shows up where hunters expect it. Most blame the draw, but the breakdown usually starts earlier: in the bow arm, the shoulder, or the grip hand that never fully relaxes.
Preventing arm fatigue during bow hunts starts with finding your weak link before opening day, not during it. Arm fatigue is the loss of strength and steady control in the muscles that hold, draw, and anchor a bow, and it builds from small inefficiencies repeated over hundreds of reps.
Here is how to run a self-check:
- Draw your bow and hold at full draw. Note the first muscle that starts shaking.
- Time how long you can hold steady before the pin floats. That is your baseline.
- Hike a mile with your bow in hand, then repeat the hold test. Note the drop.
- Log which arm fails first: bow arm, draw arm, or grip hand.
That last point matters. A tired grip hand forces the whole arm to work harder, and the fix is different from a weak shoulder. Find the source before you train the symptom.
Step 2: Build a Base With Bowhunting Shoulder Exercises
Strong, endurant shoulders carry the draw so your arms do not have to. Bowhunting shoulder exercises build the exact muscles that hold a bow steady, and they work best when you train both strength and endurance, not one or the other.
The muscles that matter most are the ones that stabilize the scapula and control the humerus: the rear deltoids, rhomboids, mid and lower trapezius, and the rotator cuff group. When those are undertrained, the smaller forearm and grip muscles take over, and they quit first.
Dumbbell and Band Exercises That Target Draw Muscles
Start with light weight and high reps. The goal is control, not maxing out. Aim for a load you could lift three more reps than you actually do, that leaves two to three reps in reserve, which keeps the joint safe while still building endurance.
- Lateral raises: slow, controlled, 12-15 reps, 2-3 sets. Lower for a 3-count, raise for a 1-count.
- Front raises: light dumbbells, full range, 12-15 reps, 2-3 sets.
- Bent-over rows: builds the back muscles that stabilize the draw, 10-12 reps, 3 sets.
- Face pulls or band pull-aparts: shoulder health and posture, 15-20 reps, 2-3 sets.
- Resistance band pulls: mimic the draw motion with a flex band, 10-15 reps per arm.
Run this circuit twice a week on non-consecutive days. Give the shoulders at least 48 hours between sessions so the tissue adapts instead of accumulating fatigue.
Muscular Endurance Sets for Holding at Full Draw
Holding steady is an endurance job, not a strength job. Train it that way.
- Anchor a light band at chest height and pull to your full-draw position.
- Hold 20-30 seconds, then rest 30 seconds. Repeat 5 times.
- Do this 3-4 days a week, and add 5 seconds to the hold every week or two before you add resistance.
- Once you can hold 45 seconds comfortably, step up to a slightly heavier band.
A common pattern is that hunters can pull heavy weight but cannot hold it steady for more than a few seconds. That gap is the whole problem. Train the hold, not the pull.
How to Progress Without Flaring Up Your Shoulder
Change one variable at a time: reps first, then hold time, then resistance. If a movement causes a sharp pinch, clicking with pain, or soreness that lasts past 48 hours, drop the load and shorten the range before you drop the exercise entirely. Warm up with 5 minutes of arm circles and band pull-aparts before any loaded work, cold shoulders are the ones that get hurt.
Step 3: Fix Your Archery Shooting Form to Cut Wasted Energy
Clean archery shooting form spends less energy on every shot, which means more steady shots late in the hunt. Small form flaws cost you far more than most hunters realize, because a flaw you repeat 200 times in practice becomes a fatigue pattern you cannot unlearn on opening morning.
Use this checklist to find the flaw that is actually draining your arms. Work top to bottom and fix one item at a time.
The Form Fatigue Checklist
1. Grip pressure. The bow should rest on the lifeline of the hand, not the palm, with the thumb and fingers relaxed. A death grip on the riser tires the forearm fast because the flexors never get to rest between shots. Test: after a shot, open your hand.
2. Bow-arm elbow rotation. Rotate the elbow so it points away from the string, not down or in. This puts the bone behind the load instead of the muscle, which is the difference between holding with structure and holding with effort.
3. Shoulder alignment. The bow shoulder should sit low and back, not shrugged up toward the ear. A raised shoulder recruits the upper trapezius, which fatigues quickly and pulls your pin off target as it tires.
4. Draw-arm elbow height. Keep the draw elbow roughly in line with the arrow, not dropped or flared high. A dropped elbow forces the rear deltoid to hold the load instead of letting the back take it.
5. Back tension and follow-through. The release should be a surprise driven by the back, not a grab with the fingers. Follow through with the release hand instead of snatching it. Snatching recruits the forearm and bicep, which is wasted energy on every shot.
6. Anchor consistency. A wandering anchor makes the hold longer, and a longer hold is a more tired arm. Pick one anchor point and hit it the same way every time.
Draw Weight and the Form Trade-Off
Check your draw weight too. If you are fighting the bow at full draw, drop to lesser poundage for practice. A smooth, controlled draw beats a heavy one you cannot hold. You can build draw weight back up over the season, adding a pound or two at a time only after you can hold your current weight steady for 30 seconds without the pin floating.
Troubleshooting by Symptom
- Pin floats immediately at full draw: draw weight is too high, or your bow shoulder is shrugged.
- Bow arm shakes late in a session: grip pressure is too tight, or the bow-arm elbow is rotated wrong.
- Draw arm burns before the bow arm: you are pulling with the arm instead of the back.
- Hand cramps after 20-30 shots: over-gripping, or the grip is too small for your hand.
Fix the cause, not the symptom. A form flaw that shows up as arm fatigue is usually a loading problem, not a strength problem.
Step 4: Use a Compound Bow Carrying Sling to Save Your Arms on the Hike
Your arms do more work carrying the bow than shooting it. A compound bow carrying sling moves that load off your hands and onto your pack, where your hips and shoulders can carry it.
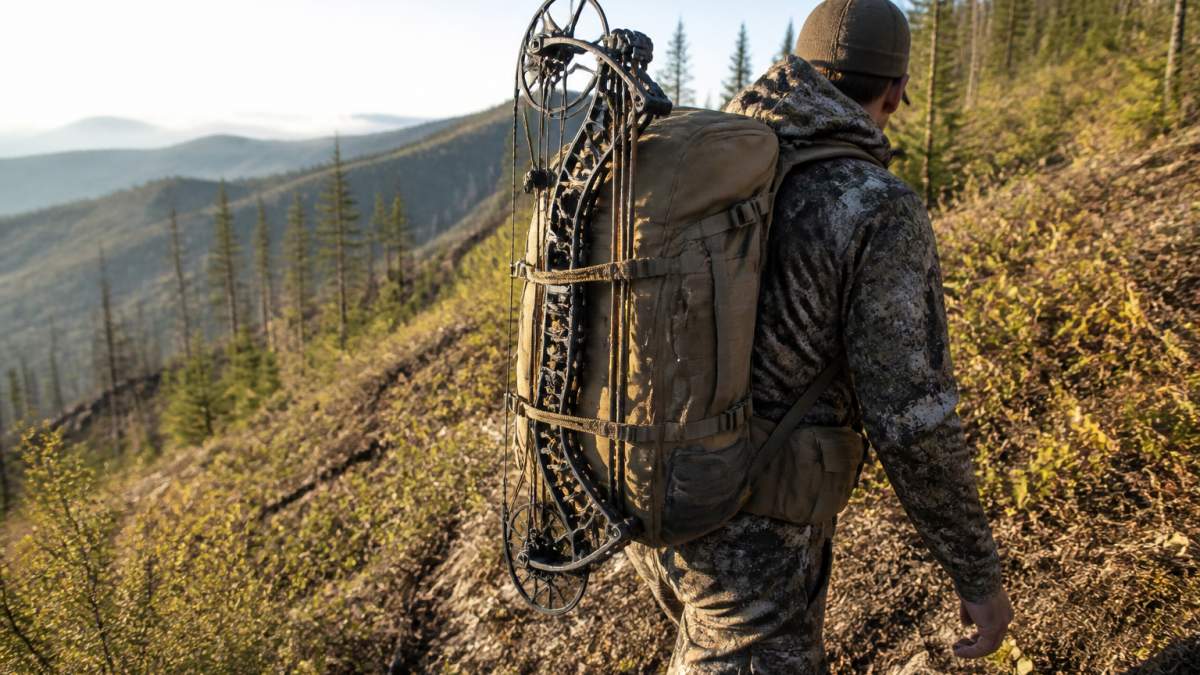
This is where gear choice pays off. Our Backpack Bow Sling attaches to the webbing of your backpack or bino-harness, hangs your bow vertical, and cinches under the cam so the bow's own weight holds it tight. When you need to shoot, you lift the bow, pull the release cord over the cam, and it falls free.
- Hands-free carry on long approaches
- Quick release for stalking and rapid deployment
- Works with most backpacks and compound bows
It is hand tied in Oregon and weighs almost nothing. If you have ever finished a hard mile with a bow clenched in one hand, you know why that matters.
Step 5: Manage Arm Fatigue in the Field
Field fatigue is a management problem, not just a fitness one. Even a well-trained hunter fades on a long, steep day, so plan around it.
- Sling the bow on approaches instead of carrying it in hand
- Glass from a rest and set the bow down when you can
- Take short breaks before your arms feel tired, not after
- Keep your pack straps adjusted so weight sits on your hips
- Stay ahead of cold and dehydration, both of which speed up fatigue
The hunters who shoot well at last light are usually the ones who spent the day protecting their arms, not the ones who trained hardest.
Step 6: Know the Difference Between Fatigue and Injury
Fatigue fades with rest. Pain that sharpens, lingers, or shows up in one spot is a different signal.
Watch for these signs:
- A dull ache that improves after a few minutes of rest: usually fatigue
- Sharp pain, clicking, or weakness that does not recover: see a doctor
- Pain that wakes you at night or lasts past a day or two: get it checked
If you are coming back from a shoulder injury, get doctor clearance before you resume draw weight. Start light, add resistance slowly, and stop if pain returns. Pushing through a real injury costs you the season, not just a workout.
Step 7: Follow a Progressive Training Timeline
A time-bound plan beats random workouts. Here is a simple build we would run before the season:
| Phase | Timeframe | Focus | Weekly Work |
|---|---|---|---|
| Base | 12-16 weeks out | General fitness, walking program | 3x cardio, 2x light strength |
| Build | 8-12 weeks out | Bowhunting shoulder exercises | 2x strength, 3x band holds |
| Sharpen | 4-8 weeks out | Draw and hold endurance | Daily band holds, live reps |
| Peak | 0-4 weeks out | Form, field reps, recovery | Light volume, rest days |
Start where your fitness level allows. Add volume slowly, one variable at a time. If you feel a joint getting angry, back off before it becomes an injury.
Conclusion
Arm fatigue is not something you fix on opening morning. It is built in the weeks before, through shoulder strength, clean form, and gear that carries the load for you.
That is exactly what our Backpack Bow Sling is for. It gives you a secure, hands-free carry, attaches to most backpacks and bino-harnesses, and releases fast when the moment comes. Hand tied in Oregon by hunters, for hunters.
Shop now and head into the season with arms that are still steady at last light.
Frequently Asked Questions
How can I prevent arm fatigue during a bow hunt?
Start with a training plan that builds shoulder strength and muscular endurance, then refine your archery shooting form to reduce wasted motion. On the hike, use a compound bow carrying sling to keep your hands free and your arms fresh. In the field, pace your stalks, take breaks, and stay hydrated. Together these steps lower arm fatigue and help you stay steady when it matters.
What bowhunting shoulder exercises reduce arm fatigue?
Focus on exercises that mimic the draw and hold. Lateral raises, dumbbell raises, and resistance band pulls target the shoulders and upper back. Add high-repetition sets with a flex band to build muscular endurance. Practice drawing your bow and holding at full draw for timed intervals. Two to three sessions a week for six to eight weeks can make a noticeable difference in how long you can hold steady.
How do I keep my bow arm steady when it gets tired?
First, check your grip and bow-hand position. A relaxed, open hand with the lifeline of the hand against the grip reduces tension. Second, lower your draw weight or use lesser poundage for practice sessions so you can hold longer. Third, practice draw and hold drills with a focus on bone alignment rather than muscle. When fatigue sets in, let down and reset instead of forcing a shaky shot.
How should I carry a compound bow to reduce arm strain while hiking?
Use a compound bow carrying sling that attaches to your backpack or bino-harness webbing. The LDH Outdoors Backpack Bow Sling ($29.95) hangs your bow vertically and cinches under the cam, keeping it secure and your hands free. This removes the constant grip strain of carrying a bow by hand and helps prevent arm fatigue during bow hunts. Inspect straps and attachment points before every use.


