

Best Bow Sling for Bino Harness: A Buying Guide
Find the right bow sling for your bino harness. Learn what to look for, how to attach, and why compatibility matters for backcountry hunting.

In this article
Table of Contents
- What Makes a Bow Sling Work With a Bino Harness
- How to Attach Bow to Backpack and Bino Harness Webbing
- Backpack Bow Sling Design: What Matters in the Field
- Bino Harness Compatibility: Critical Setup Factors
-
Key Selection Criteria for Bow Slings
- Bow Compatibility: Test It, Don't Assume It
- Attachment Method: Webbing Loop vs. Bolted vs. Harness Frame
- Release Speed: The Two-Second Benchmark
- Noise: Material Matters More Than Design
- Weight and Bulk: Ounces, Not Pounds
- Durability: Fewer Parts, Fewer Failures
- Side-by-Side Summary
- The LDH Outdoors Backpack Bow Sling
- Common Mistakes to Avoid
- Frequently Asked Questions
Last Updated: October 7, 2026
What Makes a Bow Sling Work With a Bino Harness
A best bow sling for bino harness solves one core problem: keeping your compound bow secure and accessible while your hands stay free for glassing, hiking, and quick deployment.

Most hunters already own a bino harness, so a sling that conflicts with it defeats the purpose of hands-free carry.
A functional sling must distribute your bow's weight without shifting, secure the limbs so they don't swing into brush or your face, and stay quiet in dense terrain.
How to Attach Bow to Backpack and Bino Harness Webbing
Attaching your sling correctly is the difference between a secure carry and a dropped bow. Here's the setup, plus the interference tests most guides skip.
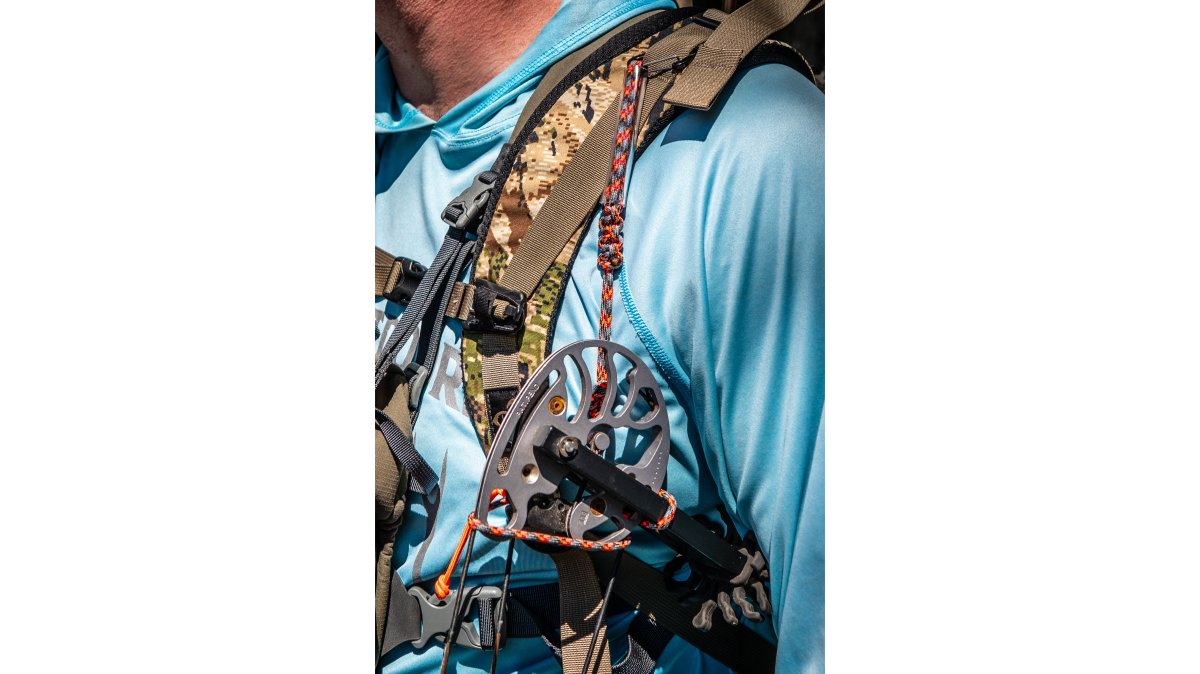
Step 1: Choose the Anchor Webbing
Identify the webbing on your backpack or bino harness where the sling will sit, usually horizontal chest webbing or the shoulder straps. Loop the sling attachment point through it as your primary anchor.
The sling should sit high enough that the bow hangs vertically without limbs hitting your pack or legs. Target: the bottom limb tip clears your knee by roughly a hand's width when standing relaxed.
Step 2: Seat the Sling on the Bow
Hang your bow from the sling: position it under the upper limb, then pull it over the cam. The release cord should point back toward you; tension cinches the sling against the cam.
Before you move, grab the riser and try to rotate it a quarter turn against the sling. If it spins freely, the sling isn't seated correctly.
Step 3: Test Interference With Your Bino Harness
This step matters most for a sling paired with a bino harness. Run these four checks before leaving the truck:
- Binocular deployment. With the bow slung, pull your binos from the pouch. If the sling cord crosses the pouch lid or front flap, move the anchor to a shoulder strap or side webbing loop.
- Rangefinder access. Draw your rangefinder with the bow slung. The sling should not cross the pouch opening or the lanyard path.
- Bow-limb-to-harness contact. Check whether the lower cam or limb tip hits the harness pouch when you lean forward. Shorten the sling or raise the anchor.
- Shoulder strap load path. If the sling and harness share a shoulder strap, load both and walk a few hundred yards. If one shoulder fatigues faster, offset the sling to the opposite strap or a central chest point.
Step 4: Match the Setup to Your Bow Type
Bow geometry changes how a sling sits.
- Standard compound (roughly 30-32 in. axle-to-axle). The sling-under-limb, over-cam method works as described. The bow hangs vertically with minimal rotation.
- Short axle-to-axle bows (under about 30 in.). The sling sits closer to the riser and the bow rotates more when you walk. Anchor higher on your chest to keep it from swinging into your leg.
- Bows with aggressive or deep-groove cams. The sling can slip off the cam if the groove is shallow or the cam is unusually wide. Test the seat by bouncing the bow gently on the sling, if it shifts, add a half-wrap around the limb before going over the cam.
Step 5: Release and Rehearse
To release, lift the weight off the sling slightly and pull the release cord over the cam; the bow falls free instantly.
Benchmark: with practice, most hunters go from slung to bow-in-hand in about two seconds with one hand. If it takes longer, the release cord is likely too short or routed on the wrong side.
Step 6: Field-Test on Real Terrain
Test on flat ground first, walk, climb stairs, simulate hunting movements. Watch for the sling shifting, the bow rotating, or rubbing against your pack, and adjust attachment height or angle until everything locks in.
Then test the terrain you actually hunt: climb a slope, crouch under a low branch, side-hill across a grade. The failure modes here, bow swinging forward on descents, cord sawing against a shoulder strap, harness riding up under load, ruin stalks.
Backpack Bow Sling Design: What Matters in the Field
The design choices that matter are the ones you'll feel after three miles of hiking or scrambling up a slope.
Attachment Points and Quick Release
Your sling needs at least one solid attachment point to your pack or bino harness webbing.
The release mechanism is critical. A hand-tied knot pulled over the cam is reliable but needs two hands and practice.
In rugged terrain, most hunters prefer simplicity: a hand-tied sling with a release cord you can feel and control beats a system you can't trust when your hands are cold or adrenaline is high.
Weight and Bulk Considerations
Every ounce matters on a backcountry hunt, and a heavy sling negates the advantage of hands-free carry.
Bulk is equally important. A sling that wraps around your torso or requires a separate harness frame adds volume to your pack and creates snag points.
The LDH Outdoors Backpack Bow Sling, for example, is hand-tied in Oregon and weighs just ounces while offering the simplicity most hunters need.
Bino Harness Compatibility: Critical Setup Factors
Your bino harness was designed to hold optics, not a bow. Adding a sling means understanding where the two systems conflict.
Second, weight distribution: a harness spreads optics weight across shoulders and chest, while a sling adds downward pull.
Third, test the combination before you hunt.
Many hunters find their bino harness wasn't designed for dual-load carry.
Key Selection Criteria for Bow Slings
Choosing the right sling means evaluating it against your hunting conditions and existing gear. Each criterion below comes with a concrete test.
Bow Compatibility: Test It, Don't Assume It
Not all slings work with all compound bows. Check that the sling loops under your upper limb and over the cam without interference from your bow's geometry.
- Standard compound (roughly 30-32 in. axle-to-axle). Most loop-style slings seat cleanly. No special accommodation needed.
- Short axle-to-axle bows (under about 30 in.). The sling sits closer to the riser and the bow rotates more in carry. Use a longer cord so you can anchor higher on your chest.
- Deep-groove or wide cams. The sling can slip if the groove is shallow or the cam unusually wide. Bounce the bow gently on the sling, if it shifts, add a half-wrap around the limb before going over the cam.
The test: With the bow slung, grab the riser and try to rotate it a quarter turn. If it spins freely, the sling isn't seated correctly for your bow's geometry.
Attachment Method: Webbing Loop vs. Bolted vs. Harness Frame
Three attachment families exist, each with trade-offs:
- Webbing-loop slings. Anchor to existing pack or bino harness webbing. Lightest, no bow modification, but need practice to seat and can shift if the anchor webbing is loose.
- Bolted slings. Bolt to the riser or stabilizer bushing. Most secure and repeatable, but require drilling or threading hardware into your bow and are effectively permanent.
- Harness-frame slings. Use a dedicated frame or strap system. Distribute weight most evenly, but add bulk, weight, and a second piece of gear alongside your bino harness.
For a bino-harness setup, webbing-loop slings fit cleanest because they add no second frame competing for shoulder space. Bolted systems work, but the bow-side hardware can catch on the harness pouch when you lean forward.
Release Speed: The Two-Second Benchmark
Release speed is critical in stalking scenarios. Target: with practice, most hunters go from slung to bow-in-hand in about two seconds with one hand.
- Hand-tied release cord. Reliable, quiet, no moving parts. Requires practice to seat and release consistently. Two hands on the first few attempts is normal.
- Mechanical quick-release (cam lock, lever, magnetic closure). Faster out of the box and one-handed, but adds weight and complexity and can freeze or jam with mud or ice.
In steep or brushy terrain where you transition from glassing to shooting fast, release speed decides it. In open country with longer approach windows, a hand-tied cord's simplicity usually wins.
Noise: Material Matters More Than Design
Noise separates good slings from great ones.
- Paracord and rope. Quietest. Minimal hardware contact.
- Nylon webbing. Louder than rope, especially rubbing against a pack strap or harness buckle.
- Plastic buckles and metal hardware. Loudest. Every buckle is a potential click or rattle.
For close-range game in open terrain, noise may not matter. In dense brush where sound travels unpredictably, a quiet sling keeps you from spooking animals.
The test: With the bow slung, walk 50 yards on gravel or dry leaves. If you hear the sling over your own footsteps, it's too loud for close-range work.
Weight and Bulk: Ounces, Not Pounds
Every ounce matters on a backcountry hunt. A heavy sling negates the advantage of carrying your bow hands-free.
- Lightest tier. Paracord or thin rope through existing webbing. A few ounces or less, packs flat.
- Mid tier. Webbing-based slings with a small buckle or adjuster. Slightly heavier, slightly bulkier, easier to adjust on the fly.
- Heaviest tier. Harness-frame systems. Most comfortable under heavy load, but add real weight and volume.
Bulk is equally important. A sling that wraps around your torso or requires a separate harness frame adds volume to your pack and creates snag points. The lightest slings use your existing backpack or bino harness webbing as the anchor, so there's nothing extra to carry or manage.
Durability: Fewer Parts, Fewer Failures
Durability is your insurance policy, a sling that fails mid-hunt is worse than no sling.
- Hand-tied slings. Minimal moving parts and quality cord. Often outlast buckled or mechanical slings because there's less to break.
- Webbing-and-buckle slings. Buckles and stitching are the wear points. Inspect both each season.
- Mechanical-release slings. The release mechanism is the wear point. Keep it clean and dry, and test before every hunt.
The test: Inspect the sling before every use. A frayed knot, worn webbing, or damaged attachment point can fail without warning, spend 30 seconds checking it each morning.
Side-by-Side Summary
| Criterion | Webbing-Loop Sling | Bolted Sling | Harness-Frame Sling |
|---|---|---|---|
| Attachment | Existing pack/harness webbing | Bow riser or stabilizer bushing | Dedicated frame or strap |
| Weight | Lightest | Light | Heaviest |
| Bulk | Minimal | Minimal | Highest |
| Release speed | Practice-dependent, ~2 sec with one hand | Practice-dependent | Varies; often slower |
| Noise | Quietest (rope/paracord) | Quiet | Loudest (hardware) |
| Bow modification | None | Required | None |
| Bino-harness fit | Cleanest, no second frame | Good, but hardware can catch pouch | Competing shoulder real estate |
| Durability | High (few parts) | High | Depends on hardware |
The LDH Outdoors Backpack Bow Sling
The LDH Outdoors Backpack Bow Sling is hand-tied in Oregon and weighs just ounces. It attaches to webbing you already have, so there's no additional bulk in your pack or on your body. At $29.95, it sits in the lightest tier above.
Common Mistakes to Avoid
Most hunters make the same setup errors that compromise performance or safety.
Attaching to the wrong webbing is the most common mistake.
Failing to inspect the sling before every use is dangerous.
Using a sling that's too heavy or bulky defeats the purpose of hands-free carry.
Not practicing the release means you'll fumble it when an animal is in range.
Mixing incompatible gear creates cascading problems.
Selecting the best bow sling for bino harness comes down to matching its design to your hunting style and existing gear. The LDH Outdoors Backpack Bow Sling delivers that simplicity with hand-tied reliability and attachment to gear you already own. At just $29.95, it's the lightest and simplest solution on the market for securely carrying your compound bow during your outdoor adventures. Shop now and experience gear built by hunters for hunters.
Frequently Asked Questions
How do you carry a bow with a bino harness without interference?
A properly designed bow sling attaches to the webbing of your bino harness or backpack, positioning the bow vertically alongside your body. The key is choosing a sling with a simple, lightweight design that doesn't add bulk or shift your harness position. The bow should hang stable and secure without pressing into your optics or chest harness, allowing you to glass and move freely. Test the setup before heading into the field to confirm the bow stays put on steep terrain.
What should you look for in a backpack bow sling?
Prioritize attachment simplicity, secure hold, and minimal weight. Look for a sling that uses webbing loops or attachment points compatible with standard backpack and bino harness webbing. The mechanism should allow quick release when you need your bow ready, but hold tight under load and movement. Hand-tied construction from durable materials offers reliability without excess bulk. Weight matters on long hunts, ultralight options reduce fatigue on multi-mile treks.
Will a bow sling interfere with a bino harness?
Not if designed for compatibility. A bow sling that attaches to the side or back webbing of your existing bino harness or backpack won't interfere with your binoculars or rangefinder access. The bow hangs vertically and independently, leaving your chest and shoulders clear. Verify before purchase that the sling's attachment points don't overlap with your harness's critical webbing. Proper positioning keeps your optics accessible and your bow secure in one integrated system.
Can you attach a bow sling to any backpack?
Most modern hunting backpacks and bino harnesses have webbing loops or attachment points designed for gear integration. A bow sling that uses simple loop attachments or webbing cinches will work on any pack with compatible webbing. However, ultralight packs with minimal webbing or older designs may lack suitable attachment points. Check your pack's webbing layout and confirm the sling's attachment method before buying. Hand-tied slings offer flexibility because they adapt to various webbing configurations.


