

How to Carry a Compound Bow on an Exo Mountain Gear Pack
Carry compound bow on an Exo Mountain Gear pack without the hassle: a step-by-step bow sling setup for hands-free, secure backcountry hiking.

In this article
Table of Contents
- Why Carrying a Compound Bow on Your Pack Beats Holding It
- What You'll Need Before You Start
- Step 1: Attach the Bow Sling to Your Pack Webbing
- Step 2: Hang the Bow and Seat the Sling on the Cam
- Step 3: Position the Bow for Stability and Limb Clearance
- Common Mistakes and Safety Checks on the Trail
- Setting Up Your Backcountry Bow Carrying Setup for Your Next Hunt
- Frequently Asked Questions
Why Carrying a Compound Bow on Your Pack Beats Holding It
Last Updated: November 1, 2026
Carrying a compound bow in your hand gets old fast. After a mile of steep trail, your forearm burns, your grip weakens, and your bow feels twice as heavy. A bow sling on your pack fixes that.
The idea is simple. You attach a sling to your existing pack webbing, hang the bow from the cam, and let the bow's weight tension the sling.
What You'll Need Before You Start
Before you touch your pack, gather everything you need. The setup takes about 10 minutes once you know the steps.
- Your Exo Mountain Gear pack with webbing on the side or front
- A Backpack Bow Sling from LDH Outdoors ($29.95)
- Your compound bow, unstrung or strung, with the cam accessible
If you already own a bino harness and a compatible bow, you can attach the sling to the webbing of your existing gear. Check that your bow's cam sits clear of the pack's edges before you commit to a final position.
Step 1: Attach the Bow Sling to Your Pack Webbing
This step connects the sling to your pack so it can carry the bow's weight. Start with your pack on the ground, empty or lightly loaded.
- Find a strong webbing point. Look for a section of webbing that stays put when you pull on it.
- Thread the sling through the webbing. Route the sling through the webbing loop, the same way you would tie on a carry strap.
- Pull it snug. Tighten until the sling holds its position when you tug gently on it.
- Test the hold. Give it a firm tug in each direction. It should not slide along the webbing.
Expected result: The sling sits firmly on the outside of your pack, ready to take the bow.
A common mistake here is attaching to a loose strap that moves when you bend or lift the pack.
Step 2: Hang the Bow and Seat the Sling on the Cam
Now you connect the bow itself.
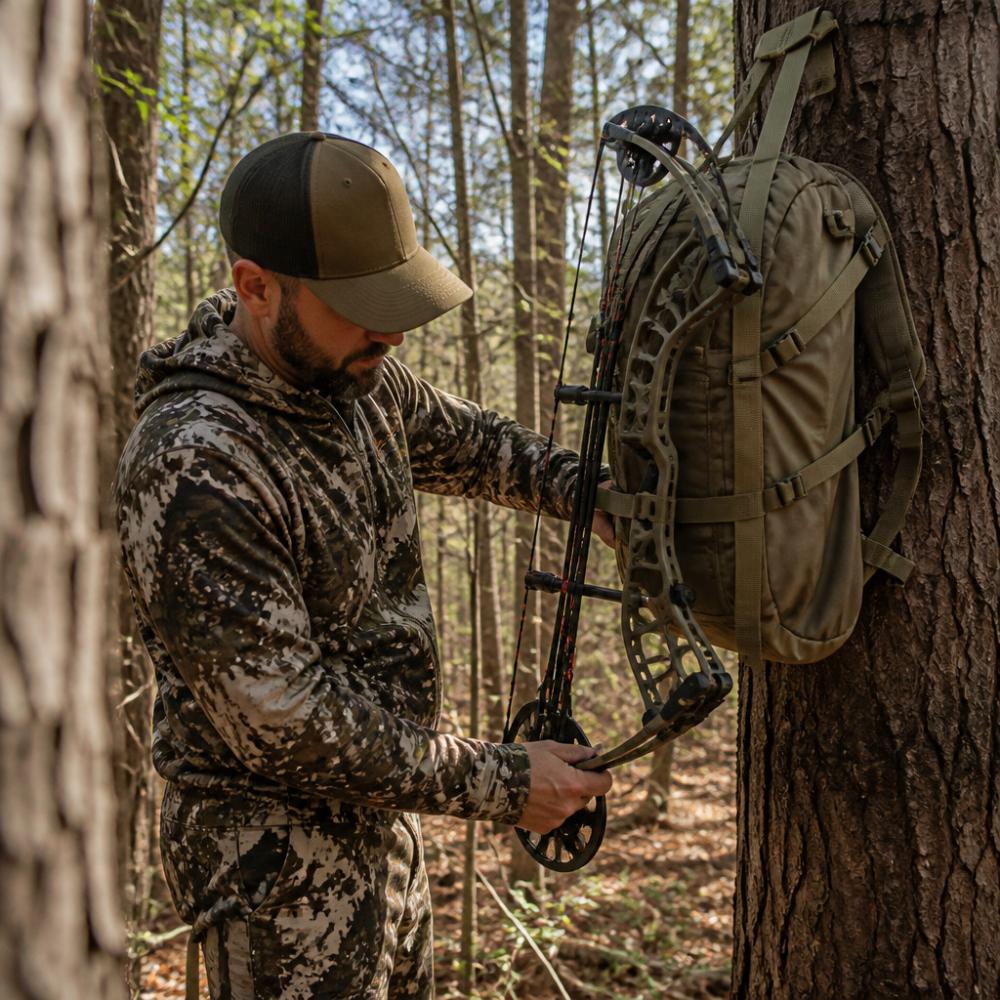
- Hang the bow vertically from the sling so it dangles straight down.
- Pull the sling under the lower limb. Feed it beneath the limb so it sits against the riser.
- Pull it over the cam. Bring the sling up and over the cam, with the release cord pointing back toward you.
- Let the bow hang. Release your grip on the bow and let its weight pull tension on the sling.
The bow's weight cinches the sling tight on the cam. The more weight the bow has, the tighter it holds.
Expected result: The bow hangs stable from the sling with no slipping when you release it.
Watch out: if you seat the sling on the wrong side of the cam, the bow can flip or swing.
Step 3: Position the Bow for Stability and Limb Clearance
Hanging the bow is only half the job.
Know your Exo attachment points before you adjust
- Upper side compression straps: Best for a vertical hang because they sit above the pack's center of gravity and keep the bow from pulling the pack sideways.
- Lower side compression straps: Useful as a secondary anchor or to pull the bottom limb tight against the pack body.
- Frame stays: The vertical aluminum stays are the stiffest point on the pack. A sling or strap routed around a stay will not slide the way it will on soft fabric.
- Belt webbing: Good for a secondary tether or a quick-access loop, but not for carrying the bow's full weight.
Orient the bow so the cams and limbs stay clear
Position the bow so the cams, limbs, string and cable guard face away from your body and away from brush you will walk through.
- Cams facing rearward and outward. The cam and its module should point back and away from your hip, not into your kidney. This keeps the cam from digging into your side on steep sidehill traverses.
- Limbs parallel to the pack body. If the limbs angle out, they will catch branches. Rotate the bow until the limbs sit flat against the pack's side panel.
- String and cables on the protected side. Route the string side toward the pack so branches brush the pack fabric instead of the string. A branch that catches a string can derail it or, worse, dry-fire the bow if it slips off the cam.
- Cable guard and sight facing forward or down. These are the most fragile protrusions. Keep them out of the swing path where they can clip rocks or tree trunks.
Set the ride height and angle
Ride height changes how the bow behaves on the trail. Too high and the top cam catches low branches; too low and the bottom cam hits your calf or the ground on steep descents.
- Start with the top cam at shoulder height. This is a common starting point because it keeps the bow's mass centered on the pack frame.
- Angle the bow slightly muzzle-down (10 to 20 degrees). A slight forward tilt keeps the bottom limb from swinging into your leg and lets the top cam clear overhead branches.
- Lock the angle with a second strap or the sling's cinch. If the bow can rotate freely, it will find a new angle every time you bend over.
Run a three-part clearance check
Before you walk more than a few steps, check clearance in three planes:
- Overhead: Raise your arms as if glassing. The top cam should not contact your arm, your binocular harness, or your pack lid.
- Side: Bend at the waist as if picking up a track. The bow should not swing out past your silhouette.
- Low: Take a deep step and a shallow step. The bottom cam should clear your calf and the ground on both.
Walk test and adjust
Walk a short distance on uneven ground, then stop and inspect. Look for three things: the sling has not slid along the webbing, the bow has not rotated, and no strap has loosened. If any of those changed, reposition the attachment and repeat.
Common Mistakes and Safety Checks on the Trail
A bow that rides well on a flat trail can shift when you add a loaded pack, a steep sidehill, or a pack-out. The mistakes below are the ones that show up in the field, not in the driveway.
Mistake 1: Setting up with an empty pack
An empty pack sits differently on your body than a loaded one. The shoulder straps compress, the frame flexes, and the side compression straps sit at a different angle. If you dial in your bow carry on an empty pack, the bow will shift once you add weight.
Fix: Do your final adjustment with the pack loaded to hunt weight, water, layers, and optics at minimum. Walk a short loop and re-check the cinch.
Mistake 2: Trusting a single attachment point
A single sling on a single strap works on flat ground. On a sidehill, the bow's weight pulls the pack to one side, and the strap can creep along the webbing. A second anchor, a short strap or cord from the lower limb to a lower compression strap, stops the creep and keeps the bow from penduluming.
Mistake 3: Ignoring how the bow interacts with your other gear
Fix: After the walk test, raise your binoculars and swing your trekking poles. If anything contacts the bow, move the attachment point one strap forward or back.
Mistake 4: Skipping the loaded-pack and pack-out check
- Keep the bow on the outside of the frame, not between the pack and your back. A bow pressed against your back will dig in and shift with every step.
Mistake 5: Letting straps interfere with movement
A loose strap end is a snag waiting to happen. Tuck or trim excess webbing so it cannot catch on your release, your sight, or a branch. Check that no strap crosses your draw path, if you have to draw with the pack on, the bow and sling must clear your string arm.
Pre-hunt safety checklist
Run this before every trip, and again after the first mile on the trail:
- Sling attached to a fixed webbing point on the frame or a compression strap
- Bow seated fully over the cam with the release cord pointing back
- Secondary tether (if used) connected and quick-release
- Limbs parallel to the pack, cams facing rearward and outward
Inspect your gear before every trip and re-check the cinch during your hike.
The field mistakes below are the ones that tend to show up on the trail rather than in the driveway.
| Mistake | Cause | Fix |
|---|---|---|
| Setup done with an empty pack | Pack sits and compresses differently once loaded | Final adjust at hunt weight, then walk a short loop |
| Single attachment point | Bow weight pulls pack sideways and strap creeps | Add a secondary tether to a lower compression strap |
| Bow clashes with other gear | Binoculars or trekking poles contact the bow | Move the attachment point one strap forward or back |
| Bow pressed against your back | Bow sits between pack and body | Keep the bow on the outside of the frame |
| Loose strap ends | Excess webbing left untrimmed | Tuck or trim so it cannot snag |
Setting Up Your Backcountry Bow Carrying Setup for Your Next Hunt
A solid bow carrying setup takes only a few minutes to build. Start with a sling on a fixed webbing point, seat the bow over the cam, and test it with a short walk before you commit to a long hike.
The Backpack Bow Sling is designed to be simple to use, and each one is hand tied in Oregon. You can find it at shop now for $29.95 and set it up before your next hunt.
Frequently Asked Questions
How do you attach a compound bow to an Exo Mountain Gear pack?
Attach the Backpack Bow Sling to the webbing of your backpack or bino-harness, then hang the bow vertically. Pull the sling under the limb and over the cam with the release cord pointed back toward you. Let the bow hang so its weight tensions the sling, which cinches it tight on the cam. The sling is designed to attach to most backpacks and most compound bows, and it is hand tied in Oregon. Check the connection before every hike.
Can you carry a compound bow on an Exo pack without a dedicated bow holder?
Carrying a bow without a dedicated holder usually means lashing it to the pack with straps, which can shift, scrape the cams, or loosen on rough terrain. A bow sling gives a more controlled connection to the cam and keeps the bow close to the pack. Whatever method you use, verify that the bow is securely attached before walking or climbing, and replace any component that shows wear or damage.
How do you keep a bow from shifting or bouncing on a pack while hiking?
Hang the bow so its weight loads the sling, which cinches it on the cam. Confirm all straps and adjustments are tight before you start moving, and recheck them after scrambling or crossing uneven ground. Position the bow so it sits close to your back and does not swing outward with each step.
What should you check before you walk or climb with a compound bow on your pack?
Inspect all straps, stitching, buckles, connectors, and attachment points. Verify that the bow is securely attached, and confirm all adjustments are tight and properly positioned. Use extra caution on uneven terrain or when climbing. Inspect your equipment regularly throughout the day. No carrying system can guarantee that equipment stays secured under every condition, so you remain responsible for proper installation and inspection.


